Cadfil Multi-Bend Ducts/Pipe Option (MBD)
 Cadfil Help contents
  Cadfil.com Home
Creating the duct mandrel using the Cadfil mandrel editor
Creating the duct mandrel using IGES import
Creating the duct mandrel using data coordinates
Creating the duct Winding Program
Winding program parameters explained
This Cadfil option can be used to generate winding programs for general 2D pipe bends such as elbows, double elbows, pipe joggles etc. A couple of examples can be seen in the pictures below. The files referenced in the example can be obtained as a zip file in an example pack (mdb_examples.zip).
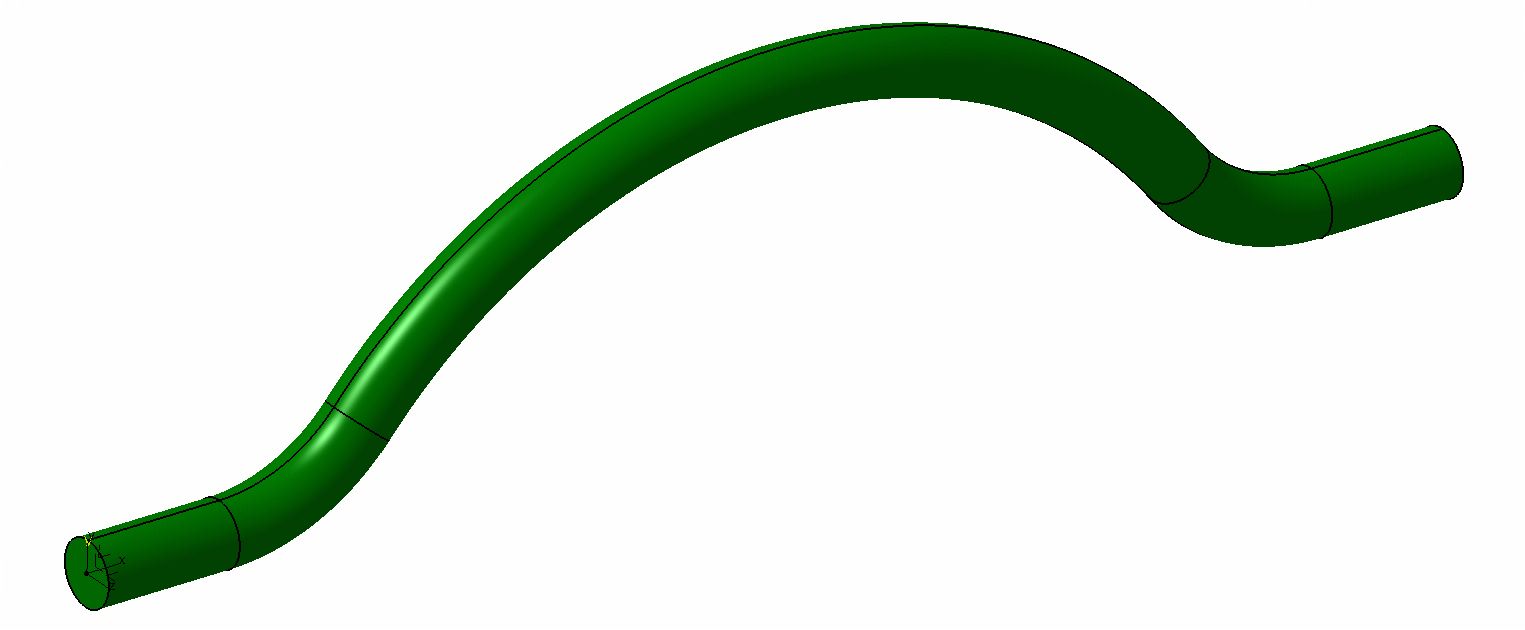
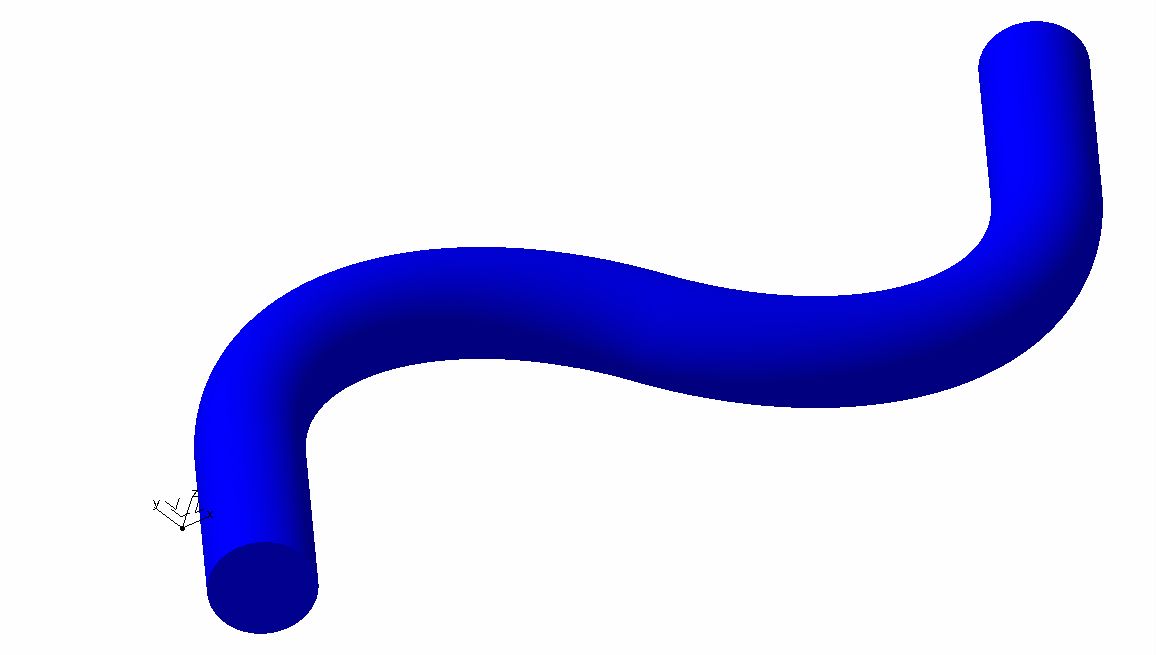
The first step in the process is to create get the mandrel geometry into Cadfil. The geometry consists of a curve for the "spine" of the mandrel and the radius of the pipe. The geometry can be create in the Cadfil mandrel editor, imported via an IGES file or imported via coordinate data in a text file created by whatever means the user has available. First we will consider example 1 shown above. A CAD drawing of the basic geometry can be seen in the figure below.
Creating the duct mandrel using the Cadfil mandrel editor
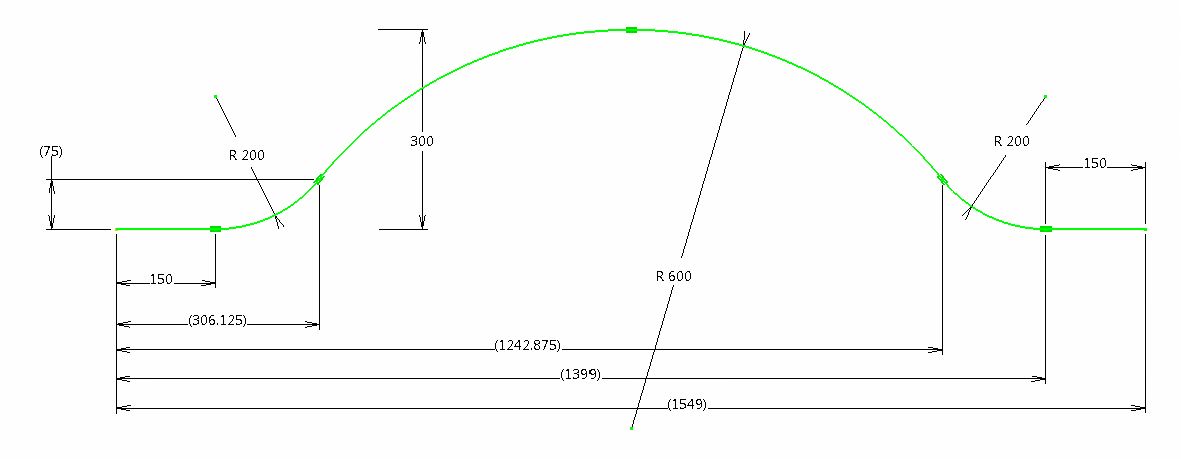
If we look at this geometry it consists of 2 lines and 3 arcs. For Cadfil the X axis of the mandrel is the axis about which it will rotate in the machine, for this example will will have the datum (X=0) position at the left hand end of the curve, you will note that we have dimensions set from this point to make life easy. Considering the line and arc end points the (X,Y) the 6 coordinates positions are (0,0), (150,0), (306.125,75), (1242.875,75), (1399,0), (1549,0). A very important point to note that in a normal horizontal axis winding machine the zero rotation position of the mandrel will be with the bend in a horizontal plane and the machine payout head positioned (working zone) is on the positive Y side of the X axis, we must consider this when we have define Y in the data above. The initial (zero rotation position) is very important as the winding will be totally out of synchronisation with the mandrel if this is not set before winding starts. If the zero orientation of the mandrel is not clear, then after making the payout path (.pay) file view it in the Advanced Graphics Window and switch on the Axes (click the tick box). The Z axis is the shortest axis arrow and on a normal machine this will point vertically upwards when the mandrel is at the zero rotation orientation.
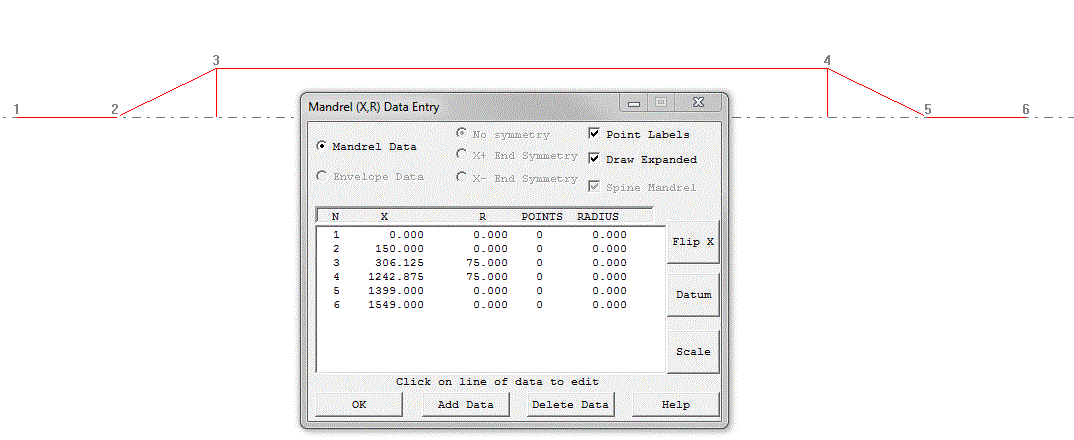
The next step is to select the "New Mandrel Option" from the Cadfil main menu. The first step is to click the Spine Mandrel Check Box which greys out options that are not needed. If you start to enter data without doing this the software will assume you are creating a normal axisymmetric mandrel and this option will automatically become unavailable! The coordinates shown above were then entered and the results can be seen below.
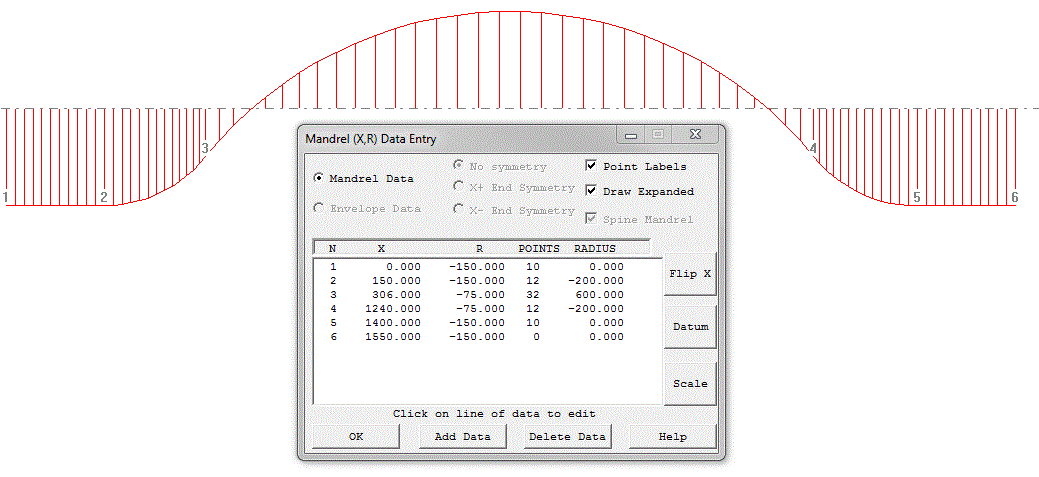
The next step is to add the curve radius and additional interpolation points (column 5 and 4 in the data table above) The results can be seen below.
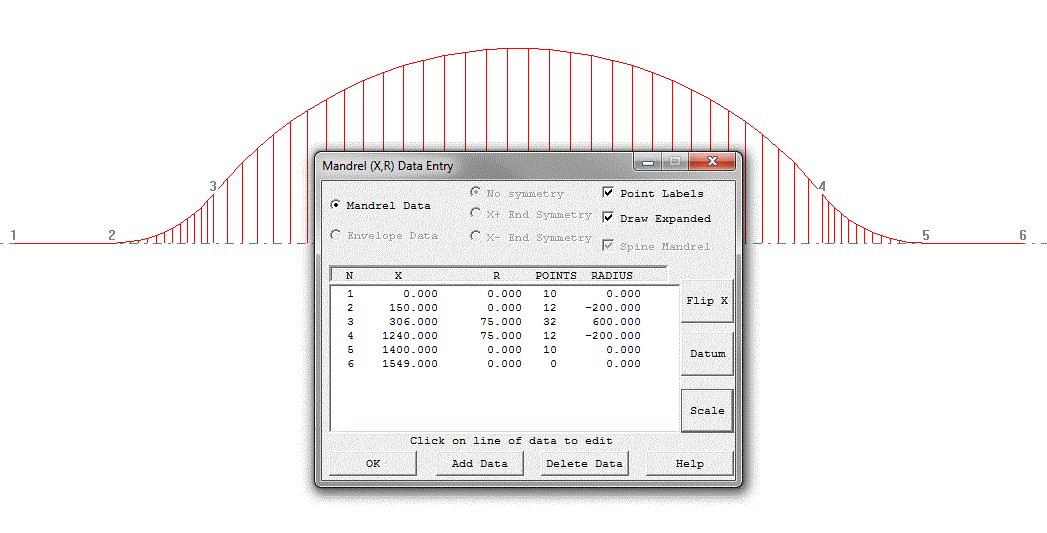
You will note the concave areas have negative radius and the convex curves have positive radius. The interpolated points are chosen to divide the mandrel in roughly equal segments and to represent the curvature. You may also note that the lines at the end are also divided but that cannot easily be seen here as the line is on the X axis. When you click OK the mandrel is saved (for the example mbdex1.mnd was used) and you are asked to enter the pipe (mandrel) radius. The mandrel file created is a text file and has the structure shown below. The fist line is the text "SPINE_MND" which identifies the file type, the second line (35.0 in this case) is the radius of the pipe, the next line is the number of lines in the table that follows. As can be seen the table is the data from the mandrel edit dialog.
SPINE_MND
   35.0000000000000
           6
    0.000000        0.000000        10    0.000000
    150.0000        0.000000        12   -200.0000
    306.0000        75.00000        32    600.0000
    1240.000        75.00000        12   -200.0000
    1400.000        0.000000        10    0.000000
    1549.000        0.000000         0    0.000000
Creating the duct mandrel using IGES import
Refer back to the CAD geometry of figure 2. In the CAD system we created points on this curve. There are many ways this could be done, it depends on the features of the CAD system used. In this instance (in Catia) we joined the curve elements together and then got the software to create 65 equally spaced points on the curve including points at the ends. This can be seen in fig 6 below. This file was then saves as an IGES file (mbd_example_1.igs).

The IGES file can be imported using the IGES option on the Utilities menu. After then picking the .igs file to import there are some questions to answer. These are "Search IGES for Axisymmetric=0) Section?" to which the answer is no, then "Search IGES for axial (YZ) sections/frames" to which the answer is again no. Cadfil will then find all the points in the IGES file that are in the Z=0 plane, order them in ascending value of X, prompt for the name of a mandrel file to create (mdbex1i.mnd), and finally ask for the radius of the pipe (75.0). This mandrel surface mesh create is shown below in figure 7 and below that the mandrel file (that could be edited in the mandrel editor from Main menu> Mandrel edit is shown below that. As can be seen the data format is the same a previously but this is not parametric like the data we created in the mandrel editor. That data we could easily edit to change the bend radii or the mesh resolution

SPINE_MND
   75.0000000000000
          65
    0.000000        0.000000         0    0.000000
    27.07912        0.000000         0    0.000000
    54.15824        0.000000         0    0.000000
    81.23736        0.000000         0    0.000000
    108.3165        0.000000         0    0.000000
    135.3956        0.000000         0    0.000000
    162.4666       0.3889204         0    0.000000
    189.2965        3.898534         0    0.000000
    215.4071        10.99758         0    0.000000
    240.3205        21.55613         0    0.000000
    263.5806        35.38091         0    0.000000
    284.7618        52.21888         0    0.000000
    303.4763        71.76183         0    0.000000
    320.7722        92.59554         0    0.000000
    338.9468        112.6664         0    0.000000
    358.0084        131.8968         0    0.000000
    377.9182        150.2477         0    0.000000
    398.6356        167.6816         0    0.000000
    420.1185        184.1631         0    0.000000
    442.3232        199.6586         0    0.000000
    465.2043        214.1364         0    0.000000
    488.7153        227.5672         0    0.000000
    512.8083        239.9236         0    0.000000
    537.4343        251.1805         0    0.000000
    562.5430        261.3148         0    0.000000
    588.0834        270.3060         0    0.000000
    614.0035        278.1357         0    0.000000
    640.2504        284.7881         0    0.000000
    666.7707        290.2495         0    0.000000
    693.5104        294.5088         0    0.000000
    720.4151        297.5574         0    0.000000
    747.4299        299.3890         0    0.000000
    774.4998        300.0000         0    0.000000
    801.5697        299.3890         0    0.000000
    828.5845        297.5574         0    0.000000
    855.4892        294.5088         0    0.000000
    882.2289        290.2495         0    0.000000
    908.7492        284.7881         0    0.000000
    934.9962        278.1357         0    0.000000
    960.9162        270.3060         0    0.000000
    986.4566        261.3148         0    0.000000
    1011.565        251.1805         0    0.000000
    1036.191        239.9236         0    0.000000
    1060.284        227.5672         0    0.000000
    1083.795        214.1364         0    0.000000
    1106.677        199.6586         0    0.000000
    1128.881        184.1631         0    0.000000
    1150.364        167.6816         0    0.000000
    1171.081        150.2477         0    0.000000
    1190.991        131.8968         0    0.000000
    1210.053        112.6664         0    0.000000
    1228.227        92.59554         0    0.000000
    1245.523        71.76183         0    0.000000
    1264.238        52.21888         0    0.000000
    1285.419        35.38091         0    0.000000
    1308.679        21.55613         0    0.000000
    1333.593        10.99758         0    0.000000
    1359.703        3.898534         0    0.000000
    1386.533       0.3889204         0    0.000000
    1413.604        0.000000         0    0.000000
    1440.683        0.000000         0    0.000000
    1467.762        0.000000         0    0.000000
    1494.841        0.000000         0    0.000000
    1521.921        0.000000         0    0.000000
    1549.000        0.000000         0    0.000000
This is the same format as created by the Cadfil mandrel editor. The first three columns are XY (XR), the other two columns are the number of Extra (interpolated) points and any fitted radius which in this case are all set to zero.
Creating the duct mandrel using data coordinates
SPINE_PTS
65
42
12.3727	105.421	0
24.7453	94.4389	0
37.118	83.4568	0
49.4907	72.4747	0
61.8634	61.4926	0
74.236	50.5105	0
86.6087	39.5284	0
98.9814	28.5463	0
111.354	17.5643	0
123.7267	6.5822	0
136.0994	-4.3999	0
148.4721	-15.382	0
160.8447	-26.3641	0
173.2174	-37.3462	0
205.0375	-64.0428	0
225.8553	-77.8909	0
247.8647	-89.7539	0
270.8772	-99.5301	0
294.6954	-107.1356	0
319.1149	-112.5052	0
343.9265	-115.5929	0
368.9173	-116.3721	0
393.873	-114.8363	0
418.5797	-110.9985	0
442.8254	-104.8918	0
466.4023	-96.5683	0
489.1081	-86.0996	0
510.7482	-73.5755	0
546.1158	-47.4028	0
561.0946	-35.7024	0
576.0735	-24.002	0
591.0523	-12.3016	0
606.0312	-0.6012	0
621.0101	11.0992	0
635.9889	22.7996	0
650.9678	34.4999	0
665.9466	46.2003	0
680.9255	57.9007	0
695.9043	69.6011	0
710.8832	81.3015	0
725.8621	93.0019	0
740.8409	104.7023	0
Creating the duct Winding Program
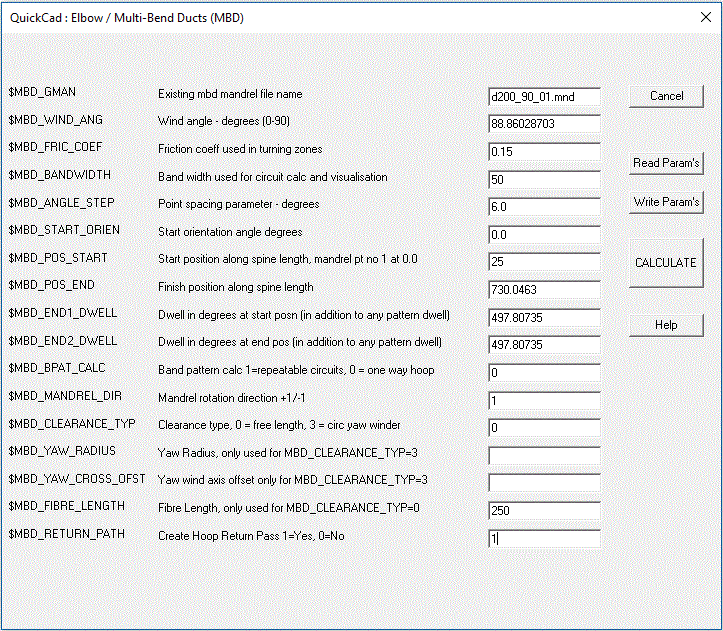
The duct winding program is created from the "MultiBend Duct/Pipe" option on the QuickCAD menu. At V9.15 a windows dialog as shown below was intoduced that allow read/save of parameter files and a calaculate option to create the winding paths. A sample parameter file (mbdex1h.par) is shown below, this is a text file created in notepad. Cut and paste the example below and then edit it. This case is a hoop winding, the wind angle has been calculated using the mandrel radius and the band width [ wind angle = atan(2*pi*r/bandwidth) ]. Like pipe winding a start and finish position is given but measured along the spine from the X- end. If you do not know the length of the spine when you run the option this is given in the Cadfil text output window so you can use this to modify the .par parameter file. In this example it is 1731.2389mm long so if we want to start 50mm from one end and finish 50mm from the other end the start/end positions are 50 & 1681.2389. The winding is shown in figure 8, but if we zoom in and look at the outside of the bend (Figure 9) we can see there are some gaps in the bands. This is because when we calculated the wind angle this gave bands that touch on on the centre line. On the outside of the bend there will be gaps and on the inside of the bend there will be overlaps. If we need coverage on the outside of the bend we must adjust the wind angle. We modify the band width bandwidth*rb/(rb+r) - where rb is the centre line bend radius and use this modified band width to calculate a new wind angle (in this case rb=600 and the modified wind angle is 87.04845717. Not that we DO NOT change the band width in the .par file only the wind angle. With this new wind angle the bands will touch perfectly on the outside of the bend. Note that if we wanted the bands to just touch on the inside of the bend the adjusted band width would be bandwidth*rb/(rb-r) for the angle calculation.
MBDUCT                  ! MultiBend duct parameter type
mdbex1.mnd              ! mandrel name this is a new format with radius, spine curve points
86.87661537             ! wind angle - degrees (0 - 90) for hoop wind_angle = atan(2*pi*r/bandwidth)
0.2                     ! friction coeff used in turning zones
12.0                    ! band width used for circuit calc and visualisation
6.0                     ! point spacing parameter - degrees
0.0                     ! start orientation angle degrees
50.0                    ! start position along spine length, mandrel pt no 1 at 0.0
1681.2389               ! finish position along spine length
360.0                   ! dwell in degrees at start posn (in addition to any pattern dwell)
360.0                   ! dwell in degrees at end pos (in addition to any pattern dwell)
200.0                   ! clearance - free fibre length
0                       ! band pattern calc 1 = yes with repeatable circuit, 0 =one way/single path
1                       ! 1/-1 mandrel rotation direction
The parameters are discussed in detail in the topic Cadfil Multi-Bend Ducts (MBD) parameters

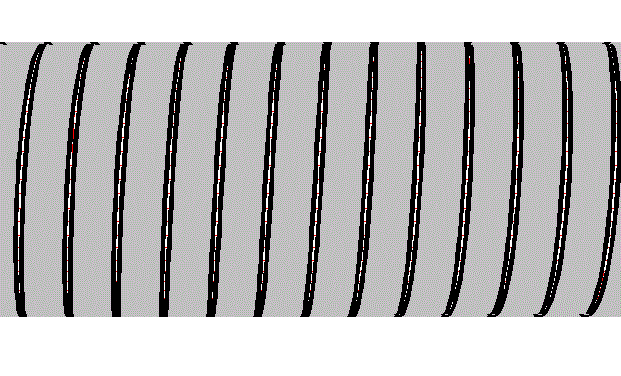
If we wanted to wind a return layer we could copy the .par file and swap the start/finish positions. The two pay file created for the cases can be combined into a single wind program using the normal post-process "combine Programs" option. An example is shown below for a 55 degree helical wind, the modified parameters are noted in red, this was saved as mbdex1hl.par and the bands can be seen in Figure 10. There is an important point here. When the first parameter file is processed the finish rotation angle of the mandrel is given in the Cadfil text window. This value should be used as the "start orientation angle" parameter in the following par file as this will ensure there is no discontinuity in the mandrel rotation.
It is also worth noting that for a helical winding (i.e. one that uses the band pattern table), the number of circuits is calculated to cover the mandrel based on the 'centre line' of the pipe. This means if the true (actual) band width has been entered there will be gaps on the outside of the bend and overlaps on the insides of the bends. If the bend radius (on the centre line) is R and the pipe radius is r then to cover the outside the bandwidth would be needs to be a factor F times wider for no gaps where F =(R+r)/R. If you need to gaps there are two methods of adjustment either make the band width you specify in the parameters smaller i.e. use BW/F or in the band pattern selection table increase the number of circuits by a factor of F. The former puts the data in the .par file which means you can't later get it wrong by forgetting to adjust the number of bands but it does mean that when you run the simulation you will still see band gaps as you are using a 'fake' reduced bandwidth rather than the real one. The adjusted circuits method will give the band appearance in the simulation that you will actually get when you wind as it is using the true band width.
For Hoop winding you would set the band pattern calculation parameter to zero. If you also wanted a double layer (along the mandrel and then back to the start) set the repetable circuit parameter to 1. Please note that, as of vertion 9.26 the software will automatically add some aditional dwell at the end (if required) to ensure the winding finishes with the mandrel at the same orientation as the start. This way the hoop layer can be directly wound repeatedly without any joining path being needed. The amount of additional dwell is reported to the Cadfil text window. Along with the total rotation for the winding and total less any whole rotations (modulo 360). For a repeatable circuit the module 360 value should always be zero.
MBDUCT                  ! MultiBend duct parameter type
mdbex1.mnd              ! mandrel name this is a new format with radius, spine curve points
55.0                    ! wind angle - degrees (0 - 90) for hoop wind_angle = atan(2*pi*r/bandwidth)
0.2                     ! friction coeff used in turning zones
12.0                    ! band width used for circuit calc and visualisation
6.0                     ! point spacing parameter - degrees
0.0                     ! start orientation angle degrees
50.0                    ! start position along spine length, mandrel pt no 1 at 0.0
1681.2389               ! finish position along spine length
360.0                   ! dwell in degrees at start posn (in addition to any pattern dwell)
360.0                   ! dwell in degrees at end pos (in addition to any pattern dwell)
200.0                   ! clearance - free fibre length
1                       ! band pattern calc 1 = yes with repeatable circuit, 0 =one way/single path
1                       ! 1/-1 mandrel rotation direction

Problem solving!
Having created the above example (Fig 10) a simulation was run using the "view payout path" option with the advance graphics "OpenGL" open enabled. For elbow winding the "4 axis (No twist)" option should be used as the standard 4 axis can cause fibre twists on the eye roll axis (AX-2) for this type of geometry. The 5 axis post-process (method 1) or the 6 axis post-process options can be used if the winder has these axes. It is useful to create examples with problems! Because the eccentricity of the mandrel (300mm - Figure 3) is large in relation to the "free fibre length" clearance (200mm) the winding is not feasible because the payout eye tries to pass under the mandrel and the rotating mandrel crashed through it! This can be seen in the simulation. This problem is removed if the free fibre length is increased to about 600mm. This is not a great scenario as with such a large free length the control of the lay-down becomes less precise. With this type of component it is often better (or indeed necessary) to minimise the eccentricity of the mandrel to reduce the cross-feed axis stroke (AX-5) or indeed make the winding feasible. With this in mind the mandrel data of Figure 5 was reopened in the mandrel editor and all the Y (i.e. R) values were reduced by 150mm. This data was saved as mdbex1b.mnd and can be seen below in Figure 11 which you should compare to figure 5. This is one advantage of using a parametric mandrel as otherwise it would be back to the CAD to change the points data. As you can see the mandrel is now 'balanced' with equal offsets either side of the winding axis. This mandrel would need some cranked (or swan neck) shafts to allow it to rotate in the winding machine. A new parameter file mbde1hlb.par was created by copying the old one and editing to referencing the new mandrel data. This worked OK in the simulation with a free fibre length of 350mm. The moral of this story is that is is important to make some programs and simulations before making the mandrel! The new winding band structure looks exactly like figure 10 but with the dotted line for the wind axis in a central position like figure 11. As always the final stage is to post-process the payout (.pay) files that are created to generate the control data for the winding machine.
