Introduction to fibre path generation
 Cadfil Help contents
  Cadfil.com Home
This section discusses the Fibre Design section of the CADFIL system. It briefly deals with the requirements for the generation of the fibre path, initially starting with meshing of the mandrel, advice on selection of the fibre start method, winding trajectories, and the fibre path requirements of the CADFIL system. It then goes on to describe example situations frequently encountered in path development.
Due to the wide variation in mandrel design, and operator path requirements, this manual cannot however, be expected to cover all possible permutations that could be achieved. The examples have therefore been chosen to enable the user to quickly gain an appreciation of the capabilities of the software, whilst providing the knowledge of how to develop fibre paths for the majority of applications.
Starting a fibre path
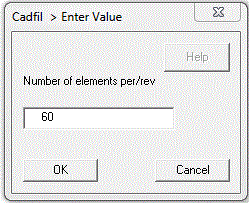
Having created a mandrel as described in previous sections a fibre path can be created. From the CADFIL initial menu select the Create Path option. The user is asked to enter/select the mandrel file name and then the Number of elements per revolution. (figure below) This is the number of elements around the mandrel and is discussed in the mandrel meshing section, it is normal to accept the default value. The start conditions for the fibre track are then requested.
Once the initial start position and direction has been selected, it is only possible to make small modification to be basic geodesic path trajectory. The only method available is to use the friction that exists between the resin, fibre and mandrel being used. This section describes how the path is started, and the subsequent sections discuss the best methods of start point selection to achieve specific requirements.
When deciding on where to start the fibre path, the user must decide on what are the main requirements of the path he wishes to generate. An appreciation of the various ways in which the fibre can be started will simplify matters. The user ought to consider the following requirements of fibre paths.
1. Is there a fibre winding angle that is necessary at specific axial locations on the mandrel?
2. Is there a requirement for the path to close down to a boss on the mandrel end(s), or to have a specific diameter opening at one end of the component?
3. Are there any features of the mandrel that may give rise to difficulties during the fibre path development?
The answers to the above questions will determine which is the quickest, simplest or most accurate method of developing the fibre path, to achieve the desired features. This is discussed in later sections.
When the path is started the mandrel is drawn in the display area in the default X-Y SIDE view. You must the specify the X location of the start position (i.e. the position along the mandrel axis). The options are:
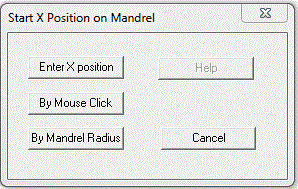
Start X position Options
Use Type is if the exact start point required is known, you are prompted to 'Enter start position'. The start position is an X coordinate in mandrel units located relative to the mandrel origin.
The Mouse option is quick if an approximate start location on the mandrel is satisfactory, pick this option then move the mouse cursor to the desired position and click the left mouse button.
The Radius is used if a specific end opening is required this option can be used refer to the following section entitled 'specific wind angle required.'
You are asked to enter the radius value and then if there are multiple possibilities you are given the option to chose one of them.Once the start position is specified the start angle can be specified from the following options:
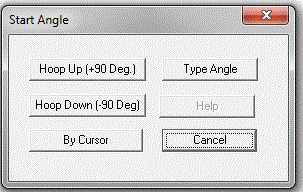
Start Angle Options
HOOP Up is used to start the fibre path in the hoop direction (+90 degree winding angle). If this option is used one hoop point is now already generated, and if the location is on the mandrel end, the opening diameter has thus been fixed.
HOOP Down is used to start the fibre with -90 degree winding angle. The direction of rotation of the mandrel in the winding machine will be opposite to using hoop up.
CURSOR This option displays a cursor cross at the position where the fibre start position was previously requested. Using the mouse, the user stretches the rubber band line to make the angle required between the band line and the horizontal. Once the approximate angle has been achieved, the user left clicks. This option is largely obsolete.
ANGLE This option pops a dialogue box requests the start angle to be input displaying, ENTER START ANGLE -/+ 180. The Start angle values are discussed in the section below.
On of the three dialog boxes shown above the CANCEL option drop back to the Cadfil Main Menu.
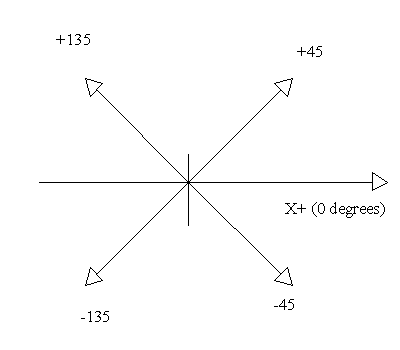
Note that Zero degrees is along the mandrel axis in the X+ direction (left to right as normally viewed on the screen), 180 degrees is along the mandrel in the X- direction. Negative wind angles will lead to the path spiralling around the mandrel on the opposite sense and will lead to negative mandrel rotation during winding.
Once the fibre start position and angle has been specified the software proceeds to the fibre creation menu