Help: Filament Wound Tube Stress Analysis from Cadfil
 Cadfil Help contents
  Cadfil.com Home
Overview
Many years ago when we started working in the field of filament winding it was apparent that some simple tools for laminate analysis of tubular filament wound components would be highly useful. There are many complex and capable software analysis systems available commercially however for day to day engineering some quick calculations are what is needed during the initial feasibility of a project. The simple questions of what diameter do I need, what wind angle should I use or how thick should it be, are the first questions that need to be answered. We developed such software and have used it for our own calculations for many years. Following frequent requests from customers we have updated the user interface and created user documents to allow this software to be made available as part of the Cadfil filament winding software systems.
Key features
- Simple user interface via a single Windows Dialog
- Material database for strength & and stiffness parameters
- The user can add their own material data
- Simple accessible spreadsheet format for materials database
- Calculation of axial & circumferential material properties as a function of wind angle.
- Load cases include axial force (tension or compression), torque, bending, shear & internal/external pressure.
- Geometry data for the tube is length, internal diameter, wall thickness & angle-ply angle (+/- wind angle)
- Can save and read input data via text files
- Creates a results report to a text file that can be easy incorporated into other documents
- Calculates fibres stresses, fibre strains and safety factors
- Calculates safety factors for column buckling and torsional buckling and inter-lamina shear
- Classical laminate analysis ply failure criteria used
- Calculates tube mass and section properties
There are thousands of calculation that one could include, for example if the tube is being used as a beam or pole you might wish to calculate the centre displacement on simple supports or the tip displacement if it is a cantilever. There are endless options, the book "Roark's Formulas for Stress and Strain (McGraw-Hill International Editions Series)" is an excellent source for such formulae. The Cadfil program presents all the necessary data such as axial modulus and inertia to give the effective "EI" for the section. You can easy plug (or cut and paste) this directly into other software or your own spread sheet calculations. This software is a useful tool for competent design engineers. Please note that it is the responsibility of the design engineer to ensure any design is fit for purpose, meets legal requirements, has suitable factors of safety etc. Crescent Consultants Ltd accepts no liability for the use of our software in this respect. Any critical design needs a rigorous design verification plan to eliminate or mitigate any risks.
User Interface

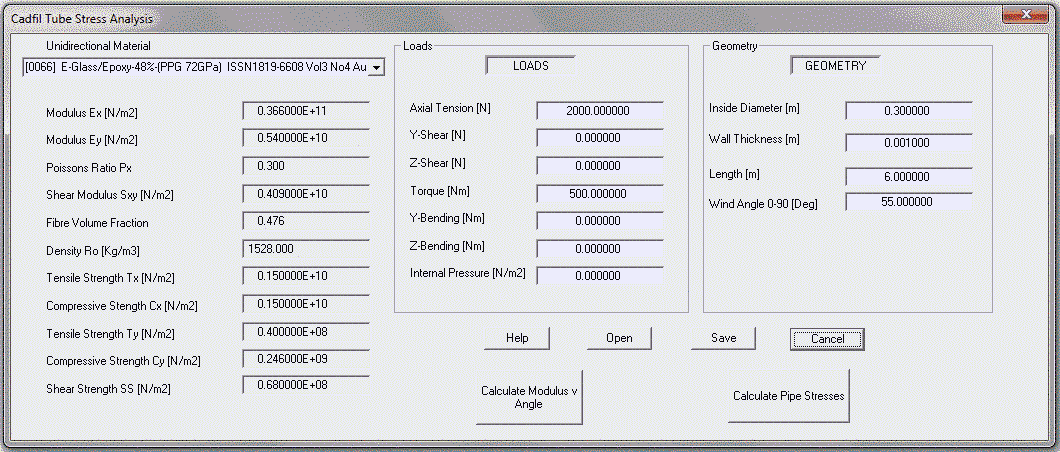
The left hand panel shows the material data which is selected from a list of materials in a pull down list populated from the material database. The database is in Excel CSV format and can be edited to add, delete or modify material data as required. The centre panel shows the different load cases and the right-hand panel is the geometry of the pipe, that is diameter, length, thickness and wind angle. Buttons are available to save the data, read back data saved earlier and to get help and technical information from the online help system. There are two calculation options the first calculates material properties as a function of wind angle and the second calculate stresses, strains, and factors of safety for the different load cases. Further information can be found on the manual pages.
Modulus / wind angle output

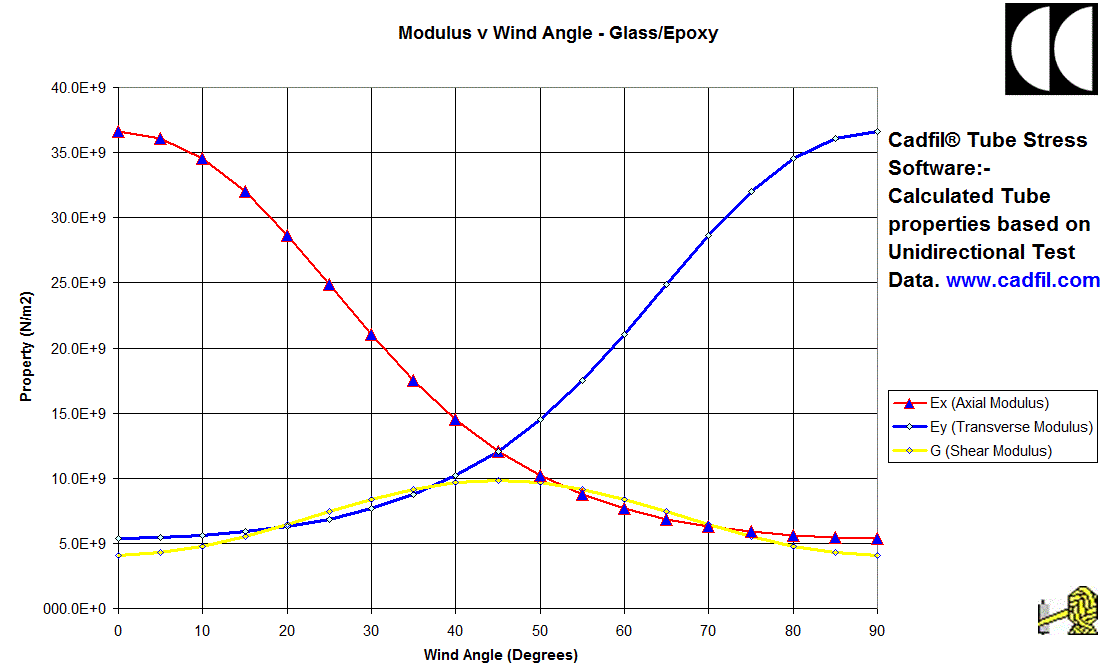
Some Sample output is shown graphed in a standard Excel template, this shows how the tube axial, hoop and shear moduli vary with wind angle. The data is based for an E-Glass /Epoxy unidirectional engineering properties from physical test data of filament wound tubes. This data was taken form the standard database of data supplied with the software. A number of published sets of data are included in the data base for glass and some more exotic filament types.
Stress, Strain and factor of safety (FOS) and other output
Some typical stress output is shown in the table (text file) shown below, a detail reference explaining all the terms and for those that need to know the theoretical basis of he calculation with references can be found in the help files.
----------------------------------------------------------------------------------------------------
 Cadfil Pipe Stress Module V1.0
 Results for the analysis of a composite tube
 Units are Strict SI - Distance [m], Stress/Stiffness [N/m2], Area [m2], Section Inertia [m4]
----------------------------------------------------------------------------------------------------
 GEOMETRY
 Length of Tube     :    8.000E+00
 Outside diameter   :  306.000E-03
 Inner diameter     :  300.000E-03
 Thickness          :    3.000E-03
 Angle of Plies(+/-):   55.000E+00

 MATERIAL DATA
 Material Name         :   E-Glass/Epoxy-48%-(PPG 72GPa)  ISSN1819-6608 Vol3 No4 Aug 2008
 Density            :    1.528E+03
 Ex 0 degree Modulus:   36.600E+09
 Ex 90 deg.  Modulus:    5.400E+09
 vx Poissons Ratio  :  300.000E-03
 G shear Modulus    :    4.090E+09

 CALCULATED PROPERTIES
 Mass               :   34.908E+00
 Area               :    2.856E-03
 IXX (J)            :   65.551E-06
 IYY=IZZ (I)        :   32.776E-06
 ZY                 :  214.220E-06
 KY                 :  211.428E-03
 E1 (axial)         :    8.739E+09
 E2 (hoop)          :   17.477E+09
 v12 (axial v)      :  309.844E-03
 v21 (trans v)      :  619.671E-03
 Shear Modulus      :    9.150E+09
 Eeq                :   12.358E+09
 veq                :  438.179E-03
 LOADS
 Axial load         :    4.000E+03
 Torque             :  500.000E+00
 Resolved Shear     :    0.000E+00
 Resolved Bending   :    0.000E+00
 Internal Pressure  :    0.000E+00

 ASSUMPTIONS.
 The Package Uses Thin Shell Theory For Pressure Loads.
 Y-Y And Z-Z Bending Moments Are Resolved By Pythagoras.
 Maximum And Minimum Bending Stresses Are Considered Independently.
 No Local Bending Is Considered In The Laminate.
 Constant Strain Through The Laminate Thickness.
 Quadratic Failure Criteria To Calculate Strength Ratios.
 Normalised Interaction Term Assumed As -1/2.
 Cowper s Formula Used To Calculate Shear Coefficient.
 UTS Taken As Strength Of Unidirectional Composite.
 Cross-Over Effects In Layers Are Ignored.


 IN-PLANE STRESSES                                   SIG1             SIG2             SIG6
 Negative Bending Moment                            1.4007E+06       0.0000E+00       1.1670E+06
 Positive Bending Moment                            1.4007E+06       0.0000E+00       1.1670E+06

 PRINCIPLE IN-PLANE STRESSES                         SIGP1           SIGP2
 Negative Bending Moment                            2.0614E+06    -660.6911E+03
 Positive Bending Moment                            2.0614E+06    -660.6911E+03

 IN-PLANE STRESS INVARIANTS                             I              R              PHASE
 Negative Bending Moment                          700.3517E+03       1.3610E+06      29.5156E+00
 Positive Bending Moment                          700.3517E+03       1.3610E+06      29.5156E+00

 INTER-LAMINA SHEAR                                   SIGXZ
 Negative Bending Moment                            0.0000E+00
 Positive Bending Moment                            0.0000E+00

 IN-PLANE STRAINS                                      e1               e2               e6
 Negative Bending Moment                          160.2877E-06     -49.6641E-06     127.5426E-06
 Positive Bending Moment                          160.2877E-06     -49.6641E-06     127.5426E-06

 ON-AXIS MATERIAL STRAINS                              ex               ey               es
 Negative Bending Moment Negative Angle Layer     -40.5175E-06     151.1411E-06     153.6681E-06
 Negative Bending Moment Positive Angle Layer      79.3333E-06      31.2903E-06    -240.9124E-06
 Positive Bending Moment Negative Angle Layer     -40.5175E-06     151.1411E-06     153.6681E-06
 Positive Bending Moment Positive Angle Layer      79.3333E-06      31.2903E-06    -240.9124E-06

 ON-AXIS MATERIAL STRESSES                            SIGX             SIGY             SIGS
 Negative Bending Moment Negative Angle Layer      -1.2548E+06     760.6236E+03     628.5024E+03
 Negative Bending Moment Positive Angle Layer       2.9940E+06     301.4908E+03    -985.3315E+03
 Positive Bending Moment Negative Angle Layer      -1.2548E+06     760.6236E+03     628.5024E+03
 Positive Bending Moment Positive Angle Layer       2.9940E+06     301.4908E+03    -985.3315E+03

 FOS FOR ON-AXIS STRESSES   +SIGX        -SIGX        +SIGY       -SIGY         SIGS
                         500.994E+00   1.195E+03    52.588E+00   0.000E+00    69.012E+00

 STRENGTH RATIOS FOR GIVEN ON-AXIS STRAINS             R               R`
 Negative Bending Moment Negative Angle Layer      44.218E+00    -149.438E+00
 Negative Bending Moment Positive Angle Layer      54.870E+00     -83.940E+00
 Positive Bending Moment Negative Angle Layer      44.218E+00    -149.438E+00
 Positive Bending Moment Positive Angle Layer      54.870E+00     -83.940E+00

 CRITICAL BUCKLING STRESSES                          TORCR1          TORCR2          SIGCR
 (TORSION METHODS 1 AND 2 AND COMPRESSION)
 Negative Bending Moment                            8.741E+06       9.783E+06     155.639E+06

 FOS ON CRITICAL BUCKLING                            TORCR1          TORCR2          SIGCR
 (TORSION METHODS 1 AND 2 AND COMPRESSION)
 Negative Bending Moment                            7.490E+00       8.383E+00       0.000E+00
 Positive Bending Moment                            7.490E+00       8.383E+00       0.000E+00

 FOS ON INTER-LAMINA SHEAR BASED ON UTS OF
  DIRECTIONAL LAYER
 Negative Bending Moment                            0.000E+00
 Positive Bending Moment                            0.000E+00
----------------------------------------------------------------------------------------------------
Contact us today
If you need further information or would like to buy this software as a stand alone item or to add to an existing Cadfil package then please contact use via the link at the top of the page and we will be happy to help.
[an error occurred while processing this directive]